User:Mrryano/Sandbox: Difference between revisions
Jump to navigation
Jump to search


mNo edit summary |
mNo edit summary |
||
| (2 intermediate revisions by the same user not shown) | |||
| Line 1: | Line 1: | ||
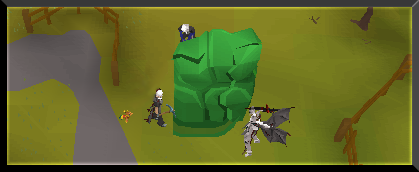
[[File:Falling_Stars.png|center]] | |||
{| class="article-table" border="0" cellpadding="1" cellspacing="1" style="width: | |||
! | [[File:Falling_Star.png|center]] | ||
{| class="article-table" style="width: auto;border: 1px solid black;" | |||
! style="background-color:navy;color:white;"|What are Falling Stars | |||
|- | |||
| style="width: auto;border: 1px solid black;" |A Falling Star is a new minigame we have added into our server. Once every 3hours, it appears randomly in one of many locations throughout the dreamscape world. The Fallen Star is a green like object that requires you to mine it, Which you get rewards from. | |||
|} | |||
[[File:Ef9af516eb8cb628122aa39676c51008.png|right|195px]] | |||
{| class="article-table" style="width: auto;border: 1px solid black;" | |||
! style="background-color:navy;color:white;"|How to find the Falling Stars | |||
|- | |||
| style="width: auto;border: 1px solid black;" |At home, there is a new telescope available behind the Ironman instance portal. This telescope will tell you how long until the next star arrives or if a star has already fallen it will share its location. | |||
|} | |||
=='''Locations: '''== | |||
Below are the listed locations of where the Fallen Star appears: | |||
{| border="0" cellpadding="1" cellspacing="1" class="article-table" style="width: 500px;" | |||
|- | |||
! scope="col"|Description | |||
! scope="col"|How to get there | |||
! scope="col"|Picture | |||
|- | |- | ||
| | | | ||
'''South of Varrock''' | |||
|Teleport to Varrock then walk south from the spawn point. | |||
|[[File:Southern_Varrock_Star.jpg|left]] | |||
|- | |||
|'''Eastern Wilderness''' | |||
|Use the Pk teleport to the Eastern Wilderness and walk north towards the fishing spots. Level 36 Wildy. | |||
|[[File:Eastern_Wilderness_Star.jpg|thumb|left]] | |||
|- | |||
|'''Southern Wilderness''' | |||
|Walk north from Edgeville on the East side of the black knights fortress. It'll be by the Bandit camp entrance. Level 17 Wildy. | |||
|[[File:Southern_Wilderness_Star.jpg|thumb|left]] | |||
|- | |||
|'''West of Lumbridge''' | |||
|Teleport to Lumbridge and walk West outside of the city. | |||
|[[File:West_of_Lumbridge.jpg|thumb|left]] | |||
|} | |||
'''How it works: ''' | |||
{| class=" | |||
Once every 3 hours the star appears, you are required to take''' Any Pickaxe '''to mine it and '''requires level 0 '''mining. You mine it by spam clicking on the star. For every 20 star dusts, you collect that grants you 1 rewards it is a 20:1 Ratio. | |||
'''Rewards:''' | |||
{| class="article-table" border="1" cellpadding="1" cellspacing="1" style="width: 600px; height: 300px;" | |||
|- | |- | ||
! scope="col" style="text-align:center;border-color:black;" |'''Image''' | |||
! scope="col" style="text-align:center;border-color:black;" |'''Item Name''' | |||
! scope="col" style="text-align:center;border-color:black;" |'''Quantity''' | |||
|- | |- | ||
| style="text-align:center;" |[[File: | | style="text-align:center;border-color:black;background-color:rgb(64,56,45);" |[[File:1b ticket.png|centre|thumb|42x42px]] | ||
| style="text-align:center;" | | | style="text-align:center;border-color:black;" |'''Bill Tickets''' | ||
| style="text-align:center;" | | | style="text-align:center;border-color:black;" |'''100/500/1000/10000/20000''' | ||
|- | |- | ||
| style="text-align:center;" |[[File: | | style="text-align:center;border-color:black;background-color:rgb(64,56,45);" |[[File:Phoenix Bones.png|centre|thumb|31x31px]] | ||
| style="text-align:center;" | | | style="text-align:center;border-color:black;" |'''Phoenix Bones''' | ||
| style="text-align:center;" | | | style="text-align:center;border-color:black;" |'''50''' | ||
|- | |- | ||
| style="text-align:center;" |[[File: | | style="text-align:center;border-color:black;background-color:rgb(64,56,45);" |[[File:Crystal key - Image.png|centre|thumb|45x45px]] | ||
| style="text-align:center;" | | | style="text-align:center;border-color:black;" |'''Crystal Keys''' | ||
| style="text-align:center;" | | | style="text-align:center;border-color:black;" |'''50''' | ||
|- | |- | ||
| style="text-align:center;" |[[File: | | style="text-align:center;border-color:black;background-color:rgb(64,56,45);" |[[File:Vanguard Helmet.png|centre|thumb|31x31px]] | ||
| style="text-align:center;" | | | style="text-align:center;border-color:black;" |'''Vanguard Helmet''' | ||
| style="text-align:center;" | | | style="text-align:center;border-color:black;" |'''1''' | ||
|- | |- | ||
| style="text-align:center;" |[[File: | | style="text-align:center;border-color:black;background-color:rgb(64,56,45);" |[[File:Vanguard Body.png|centre|thumb|30x30px]] | ||
| style="text-align:center;" | | | style="text-align:center;border-color:black;" |'''Vanguard Body''' | ||
| style="text-align:center;" | | | style="text-align:center;border-color:black;" |'''1''' | ||
|- | |- | ||
| style="text-align:center;" |[[File: | | style="text-align:center;border-color:black;background-color:rgb(64,56,45);" |[[File:Vanguard Legs.png|centre|thumb|29x29px]] | ||
| style="text-align:center;" | | | style="text-align:center;border-color:black;" |'''Vanguard Legs''' | ||
| style="text-align:center;" | | | style="text-align:center;border-color:black;" |'''1''' | ||
|- | |- | ||
| style="text-align:center;" |[[File: | | style="text-align:center;border-color:black;background-color:rgb(64,56,45);" |[[File:Vanguard Boots.png|centre|thumb|24x24px]] | ||
| style="text-align:center;" | | | style="text-align:center;border-color:black;" |'''Vanguard Boots''' | ||
| style="text-align:center;" | | | style="text-align:center;border-color:black;" |'''1''' | ||
|- | |- | ||
| style="text-align:center;" |[[File: | | style="text-align:center;border-color:black;background-color:rgb(64,56,45);" |[[File:Vanguard Gloves.png|centre|thumb|21x21px]] | ||
| style="text-align:center;" | | | style="text-align:center;border-color:black;" |'''Vanguard Gloves''' | ||
| style="text-align:center;" | | | style="text-align:center;border-color:black;" |'''1''' | ||
|- | |- | ||
| style="text-align:center;" |[[File: | | style="text-align:center;border-color:black;background-color:rgb(64,56,45);" |[[File:Drygore Offhand.png|centre|thumb|31x31px]] | ||
| style="text-align:center;" | | | style="text-align:center;border-color:black;" |'''Drygore Offhand''' | ||
| style="text-align:center;" | | | style="text-align:center;border-color:black;" |'''1''' | ||
|- | |- | ||
| style="text-align:center;" |[[File: | | style="text-align:center;border-color:black;background-color:rgb(64,56,45);" |[[File:Drygore Offhand (u).png|centre|thumb|46x46px]] | ||
| style="text-align:center;" | | | style="text-align:center;border-color:black;" |'''Drygore Offhand (u)''' | ||
| style="text-align:center;" | | | style="text-align:center;border-color:black;" |'''1''' | ||
|- | |- | ||
| style="text-align:center;" |[[File: | | style="text-align:center;border-color:black;background-color:rgb(64,56,45);" |[[File:Mystery Box - Image.png|centre|thumb|37x37px]] | ||
| style="text-align:center;" | | | style="text-align:center;border-color:black;" |'''Mystery Box''' | ||
| style="text-align:center;" | | | style="text-align:center;border-color:black;" |'''10''' | ||
|- | |- | ||
| style="text-align:center;" |[[File: | | style="text-align:center;border-color:black;background-color:rgb(64,56,45);" |[[File:Icy bones.png|centre|thumb|31x31px]] | ||
| style="text-align:center;" | | | style="text-align:center;border-color:black;" |'''Icy Bones''' | ||
| style="text-align:center;" | | | style="text-align:center;border-color:black;" |'''50''' | ||
|- | |- | ||
| style="text-align:center;" |[[File: | | style="text-align:center;border-color:black;background-color:rgb(64,56,45);" |[[File:Lamp.png|centre|thumb|29x29px]] | ||
| style="text-align:center;" | | | style="text-align:center;border-color:black;" |'''Lamps''' | ||
| style="text-align:center;" | | | style="text-align:center;border-color:black;" |'''5/10''' | ||
|- | |- | ||
| style="text-align:center;" |[[File: | | style="text-align:center;border-color:black;background-color:rgb(64,56,45);" |[[File:Hylian Shield.png|centre|thumb|28x28px]] | ||
| style="text-align:center;" | | | style="text-align:center;border-color:black;" |'''Hylian Shield''' | ||
| style="text-align:center;" | | | style="text-align:center;border-color:black;" |'''1''' | ||
|- | |- | ||
| style="text-align:center;" |[[File: | | style="text-align:center;border-color:black;background-color:rgb(64,56,45);" |[[File:Statius Full Helm.png|centre|thumb|28x28px]] | ||
| style="text-align:center;" | | | style="text-align:center;border-color:black;" |'''Statius Helm''' | ||
| style="text-align:center;" | | | style="text-align:center;border-color:black;" |'''1''' | ||
|- | |- | ||
| style="text-align:center;" |[[File: | | style="text-align:center;border-color:black;background-color:rgb(64,56,45);" |[[File:Statius' Platebody.png|centre|thumb|31x31px]] | ||
| style="text-align:center;" | | | style="text-align:center;border-color:black;" |'''Statius Body''' | ||
| style="text-align:center;" | | | style="text-align:center;border-color:black;" |'''1''' | ||
|- | |- | ||
| style="text-align:center;" |[[File: | | style="text-align:center;border-color:black;background-color:rgb(64,56,45);" |[[File:Statius' Platelegs.png|centre|thumb|31x31px]] | ||
| style="text-align:center;" | | | style="text-align:center;border-color:black;" |'''Statius Legs''' | ||
| style="text-align:center;" | | | style="text-align:center;border-color:black;" |'''1''' | ||
|- | |- | ||
| style="text-align:center;" |[[File: | | style="text-align:center;border-color:black;background-color:rgb(64,56,45);" |[[File:Flame Torva Body.png|centre|thumb|33x33px]] | ||
| style="text-align:center;" | | | style="text-align:center;border-color:black;" |'''Flame Torva Body''' | ||
| style="text-align:center;" | | | style="text-align:center;border-color:black;" |'''1''' | ||
|- | |- | ||
| style="text-align:center;" |[[File: | | style="text-align:center;border-color:black;background-color:rgb(64,56,45);" |[[File:Flame Torva Helm.png|centre|thumb|30x30px]] | ||
| style="text-align:center;" | | | style="text-align:center;border-color:black;" |'''Flame Torva Helm''' | ||
| style="text-align:center;" | | | style="text-align:center;border-color:black;" |'''1''' | ||
|- | |- | ||
| style="text-align:center;" |[[File: | | style="text-align:center;border-color:black;background-color:rgb(64,56,45);" |[[File:Flame Torva Legs.png|centre|thumb|29x29px]] | ||
| style="text-align:center;" | | | style="text-align:center;border-color:black;" |'''Flame Torva Platelegs''' | ||
| style="text-align:center;" | | | style="text-align:center;border-color:black;" |'''1''' | ||
|- | |- | ||
| style="text-align:center;" |[[File: | | style="text-align:center;border-color:black;background-color:rgb(64,56,45);" |[[File:Flame Gloves.png|centre|thumb|33x33px]] | ||
| style="text-align:center;" | | | style="text-align:center;border-color:black;" |'''Flame Gloves''' | ||
| style="text-align:center;" | | | style="text-align:center;border-color:black;" |'''1''' | ||
|- | |- | ||
| style="text-align:center;" |[[File: | | style="text-align:center;border-color:black;background-color:rgb(64,56,45);" |[[File:Flame Pernix Cowl.png|centre|thumb|45x45px]] | ||
| style="text-align:center;" | | | style="text-align:center;border-color:black;" |'''Flame Pernix Helm''' | ||
| style="text-align:center;" | | | style="text-align:center;border-color:black;" |'''1''' | ||
|- | |- | ||
| style="text-align:center;" |[[File: | | style="text-align:center;border-color:black;background-color:rgb(64,56,45);" |[[File:Flame Pernix Body.png|centre|thumb|47x47px]] | ||
| style="text-align:center;" | | | style="text-align:center;border-color:black;" |'''Flame Pernix Body''' | ||
| style="text-align:center;" | | | style="text-align:center;border-color:black;" |'''1''' | ||
|- | |- | ||
| style="text-align:center;" |[[File: | | style="text-align:center;border-color:black;background-color:rgb(64,56,45);" |[[File:Flame Pernix Chaps.png|centre|thumb|46x46px]] | ||
| style="text-align:center;" | | | style="text-align:center;border-color:black;" |'''Flame Pernix Legs''' | ||
| style="text-align:center;" | | | style="text-align:center;border-color:black;" |'''1''' | ||
|- | |- | ||
| style="text-align:center;" |[[File: | | style="text-align:center;border-color:black;background-color:rgb(64,56,45);" |[[File:GLOCK.png|centre|thumb|37x37px]] | ||
| style="text-align:center;" | | | style="text-align:center;border-color:black;" |'''Glock''' | ||
| style="text-align:center;" | | | style="text-align:center;border-color:black;" |'''1''' | ||
|- | |- | ||
| style="text-align:center;" |[[File: | | style="text-align:center;border-color:black;background-color:rgb(64,56,45);" |[[File:Royal Sicle.png|thumb|28x28px|centre]] | ||
| style="text-align:center;" | | | style="text-align:center;border-color:black;" |'''Royal Sicle''' | ||
| style="text-align:center;" | | | style="text-align:center;border-color:black;" |'''1''' | ||
|- | |- | ||
| style="text-align:center;" |[[File: | | style="text-align:center;border-color:black;background-color:rgb(64,56,45);" |[[File:White Glass Wings.png|thumb|46x46px|centre]] | ||
| style="text-align:center;" | | | style="text-align:center;border-color:black;" |'''White Glass Wings''' | ||
| style="text-align:center;" | | | style="text-align:center;border-color:black;" |'''1''' | ||
|- | |- | ||
| style="text-align:center;" |[[File: | | style="text-align:center;border-color:black;background-color:rgb(64,56,45);" |[[File:Flippers.png|thumb|32x32px|centre]] | ||
| style="text-align:center;" | | | style="text-align:center;border-color:black;" |'''Flippers''' | ||
| style="text-align:center;" | | | style="text-align:center;border-color:black;" |'''1''' | ||
|- | |- | ||
| | | style="text-align:center;border-color:black;background-color:rgb(64,56,45);" |[[File:Golden Katana.png|thumb|38x38px|centre]] | ||
| style="text-align:center;border-color:black;" |'''Golden Katana''' | |||
| style="text-align:center;border-color:black;" |'''1''' | |||
|- | |||
| style="text-align:center;border-color:black;background-color:rgb(64,56,45);" |[[File:Ice Katana.png|thumb|50x50px|centre]] | |||
| style="text-align:center;border-color:black;" |'''Ice Katana''' | |||
| style="text-align:center;border-color:black;" |'''1''' | |||
|- | |||
| style="text-align:center;border-color:black;background-color:rgb(64,56,45);" |[[File:Gold Chain.png|thumb|34x34px|centre]] | |||
| style="text-align:center;border-color:black;" |'''Gold Chain''' | |||
| style="text-align:center;border-color:black;" |'''1''' | |||
|- | |- | ||
| | | style="text-align:center;border-color:black;background-color:rgb(64,56,45);" |[[File:Dream Wing Boots.png|thumb|50x50px|centre]] | ||
| style="text-align:center;border-color:black;" |'''Dream Wings Boots''' | |||
| style="text-align:center;border-color:black;" |'''1''' | |||
|} | |} | ||
[[Category: | [[Category:Minigames]] | ||
[[Category: | [[Category:Mining]] | ||
Latest revision as of 04:04, 1 March 2023


| What are Falling Stars |
|---|
| A Falling Star is a new minigame we have added into our server. Once every 3hours, it appears randomly in one of many locations throughout the dreamscape world. The Fallen Star is a green like object that requires you to mine it, Which you get rewards from. |

| How to find the Falling Stars |
|---|
| At home, there is a new telescope available behind the Ironman instance portal. This telescope will tell you how long until the next star arrives or if a star has already fallen it will share its location. |
Locations: [edit]
Below are the listed locations of where the Fallen Star appears:
| Description | How to get there | Picture |
|---|---|---|
|
South of Varrock |
Teleport to Varrock then walk south from the spawn point. |  |
| Eastern Wilderness | Use the Pk teleport to the Eastern Wilderness and walk north towards the fishing spots. Level 36 Wildy. | |
| Southern Wilderness | Walk north from Edgeville on the East side of the black knights fortress. It'll be by the Bandit camp entrance. Level 17 Wildy. | |
| West of Lumbridge | Teleport to Lumbridge and walk West outside of the city. |


How it works:
Once every 3 hours the star appears, you are required to take Any Pickaxe to mine it and requires level 0 mining. You mine it by spam clicking on the star. For every 20 star dusts, you collect that grants you 1 rewards it is a 20:1 Ratio.
Rewards:
| Image | Item Name | Quantity |
|---|---|---|
| Bill Tickets | 100/500/1000/10000/20000 | |
| Phoenix Bones | 50 | |
| Crystal Keys | 50 | |
| Vanguard Helmet | 1 | |
| Vanguard Body | 1 | |
| Vanguard Legs | 1 | |
| Vanguard Boots | 1 | |
| Vanguard Gloves | 1 | |
| Drygore Offhand | 1 | |
| Drygore Offhand (u) | 1 | |
| Mystery Box | 10 | |
| Icy Bones | 50 | |
| Lamps | 5/10 | |
| Hylian Shield | 1 | |
| Statius Helm | 1 | |
| Statius Body | 1 | |
| Statius Legs | 1 | |
| Flame Torva Body | 1 | |
| Flame Torva Helm | 1 | |
| Flame Torva Platelegs | 1 | |
| Flame Gloves | 1 | |
| Flame Pernix Helm | 1 | |
| Flame Pernix Body | 1 | |
| Flame Pernix Legs | 1 | |
| Glock | 1 | |
| Royal Sicle | 1 | |
| White Glass Wings | 1 | |
| Flippers | 1 | |
| Golden Katana | 1 | |
| Ice Katana | 1 | |
| Gold Chain | 1 | |
| Dream Wings Boots | 1 |

.png)